Here’s how to mod an affordable T-type into the Tele of your dreams
Telecaster-style guitars are renowned for their appealing simplicity – there’s a certain romance to the idea of a guitar that stays so close to just “wood slab with neck attached”. Its nature as one of the most simple electric guitar designs has helped cement the Telecaster’s reputation as a reliable workhorse, but it also means it’s a fantastic mod platform.
Helping more with this is an abundance of aftermarket Telecaster-compatible parts, whether you want a modern conversion, an authentic-looking vintage-styled instrument or a best-of-both-worlds combination of the two approaches. And you don’t have to take a drill and a soldering iron to a US-made Fender, either – there’s a similar abundance of affordable Telecaster-compatible T-type guitars, such as our patient today, a Vintage (the brand) V20 Coaster. Let’s dive into the process of giving it a full overhaul!
READ MORE: The magic of partscasters – build your perfect guitar yourself
The Patient
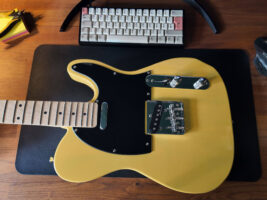
This particular guitar is unashamedly Tele-alike – with a butterscotch single-cutaway body, maple neck, and two single-coils. It was purchased as B-stock for an extremely affordable £130. Guitars at this price point are fantastic for complete overhauls, and really all kinds of DIY messing about: the quality of guitars like this is nowadays relatively high, particularly in the fretwork. But if you make a wrong move with a screwdriver, dremel or soldering iron, and it’s a lot less of a financial tragedy.
The guitar itself is far from perfect, but the important thing here is that the basic construction is very good. Where it falls a little short is in the hardware, which is a little generic – particularly the sealed tuners, which after a bit of testing reveal themselves to be a bit stiff and not very stable. The Alan Entwistle pickups are actually pretty neat to see at this price, but they’re not the most authentically vintage-sounding things out there, and lack a little punch and character.
So, there’ll be a big benefit to the hardware and electronics swap – let’s get going.
Strip things back
The first thing to do with any project like this is figure out what you’re working with – for a total overhaul, it can be helpful to strip it down to a blank canvas before ordering a bunch of parts, just so you can be a little more sure about compatibility.
In this particular case, we do have basically the standard Telecaster routing, with room for upgraded electronics. Like most affordable guitars, the V20 comes with mini-pots, and so I do a quick test-fit of a full CTS-sized control pot in the electronics cavity to make sure I won’t have to do any routing when I switch stuff out. I might have to drill a bigger hole in the control plate itself, but that’s a bridge we can cross a little later, along with the, er, bridge.
Shields up
This being a single-coil guitar, proper shielding is almost essential. Without it, electrical interference from the outside world will leak into the parts of your guitar’s wiring that generate signal, and you’ll hear it through your amp, particularly with single-coils – but shielding the cavities in which your pickups and controls sit can very much improve this.
From the factory the V20 came with zero cavity shielding – so that’s first on the list to sort. Luckily this is both easy and also therapeutic – you’ll just need some conductive copper tape, some scissors, and something to help manipulate the tape in hard-to-reach areas, and maybe a good true crime podcast – this takes longer than you think.
You’ll also want to make sure your conductive tape has conductive adhesive – this means that as you place a new piece of tape, it will have continuity with the piece you’ve just slapped it on – and so when you coat a cavity with it, you make an electronically-connected faraday cage to absorb interference and send it away to ground.
The standard Telecaster routing pattern has several discrete pits that are hidden by the hardware. The shielding in each needs to be connected to the guitar’s ground to be effective – you can either solder a jumper wire between each to achieve this, or do what I did, and place copper tape to carry continuity down to the control cavity. The pickup grounds are connected to the back of the volume pot, and the volume pot is screwed into the metal control plate – so as long as the shielding tape has a conductive path to this plate, we’re all groovy.
The cavity for the bridge pickup is a little more involved – from the factory, the strings are grounded through a wire that’s sandwiched between the body and the bridge plate. For a good ground connection for the shielding, we can just make sure this wire is also sandwiched against the copper tape at one end, and connected to the back of a pot.
Building Bridges
It’s important to check the style of Tele bridge plate you’re using. You can see here that it’s mounted to the body with four screws behind the saddles. This is the same arrangement as official Fender parts and most aftermarket replacements. There are some affordable Telecasters and T-types (including the cheapest Squiers) which have something that on the surface looks like the classic bridge plate, but has a screw in each corner instead – there aren’t really many drop-in replacements for these plates.
However if you do have something like this, then you can still upgrade your bridge by replacing the saddles but keeping the same plate. Doing this just means you need to keep the same number of saddles. Some Telecaster bridges are three-saddle, some are six-saddle – meaning you can upgrade with (compensated, ideally) brass barrel saddles in the former case, and vintage or modern hardtail saddles in the latter.
Another consideration is the bridge pickup, which is obviously mounted straight to the bridge plate. There are plates out there that take humbuckers, but they’re not a simple drop-in deal – as you can see, the route underneath the bridge plate here (and in most single-coil T-types) is shaped directly for a single-coil pickup. If you want a humbucker-equipped guitar, either be ready to route, or start with an already humbucker-equipped platform to upgrade.
For this guitar, I’m swapping out the whole plate and staying in single-coil land, which makes it a more simple drop in – I just run through the ground and the hot wire of the bridge pickup to the control cavity before attaching the bridge. And speaking of that control cavity:
Electronics overhaul
With a T-type guitar, it’s good to re-do the electronics first. The handy thing is that all of the controls are attached to a single plate. This too can be cleared out, with the original switch and the original pots saved for use as spares.
I’m using Stewmac’s Premium Telecaster Wiring Kit here, which comes with full-sized pots. This means a test fit is a good idea, as like most affordable guitars, the V20 comes with mini-pots, – cross-compatibility is never guaranteed, even if you’re using an official Fender or Squier body.
Here, the full-size CTS pots fit – but only just. They’re a few tenths of a millimetre away from needing me to get the dremel out and carve away some material, but as it stands I’m happy with the pots contacting the shielding tape – it’s all going to ground anyway.
I do need to drill a slightly bigger hole in the plate for the larger sized pots – if you don’t have a step bit, or just don’t trust your drilling abilities, you can grab an aftermarket plate sized for CTS pots.
Here’s a good opportunity to talk about why this is worth doing. As previously stated the base guitar here is good – the frets are fine, the neck feels nice, and it’s the right shape and so on. However, even just using this switch is a world of difference to the cheap stock one – it’s got a reassuring clunk, and just makes interacting the guitar feel like a more premium experience.
Sonically, of course, the pickups have had the biggest impact – StewMac’s Telecaster set sounds fanstastic, with a punchy, bright bridge that’s not too brittle, and a warm-yet-articulate neck pickup that’s perfect for smooth, overdriven solos. If you’re doing just one thing to a cheap guitar, the pickups are perhaps the thing to start with if you want a big leap in tonal quality!
Tuner time
The V20 Coaster’s tuners are more modern sealed-gear ones – not in-line Kluson-style ones. It’s important to measure your post holes, and check the angle of the mounting screw is correct here – not all tuners are cross-compatible, and conversions can be tricky. Luckily this Gotoh set I grabbed as a replacement fit straight in with no modifications.
But… one thing I didn’t really foresee was their impact on the balance of the guitar! They’re relatively high-mass locking units, and the guitar’s body is seemingly made out of a very light and affordable wood – and so there’s a little bit more pull on the shoulder strap than before. When looking for tuners, keep this in mind, particularly if you’re working with a lighter guitar.
Wrapping it up
With the hardware and the electronics overhauled, the guitar can be re-strung and setup. The Wilkinson compensated bridge allows for some really in-depth adjustments, and so I spend a while with an accurate tuner and a set of allen keys getting intonation perfect, something not normally easily achieved with even a compensated Telecaster bridge. After this I dial in pickup heights for consistent output, give the nut a little lubrication, and find a compressor pedal for some old-scool Tele clean playing to give it a whirl.
It is a marked difference from the unmodded guitar – the pickup swap has totally changed the sounds on offer, and the more premium hardware makes it far more inviting to play. However, there’s always more you can do in terms of modding. I eschewed a fret polish this time, but doing one can sometimes make a guitar go from feeling a little gritty and cheap to feeling very premium indeed. I also don’t quite love the feel of the back of the neck – it’s a slightly generic-feeling pale satin finish that, again, feels a little gritty. This can be remedies with some ScotchBrite, or, if you were feeling very brave, you could grab a Telecaster compatible neck – Fender-style bolt-ons are often totally compatible with each other, but I’d get the calipers out if I was switching this one, mainly thanks to its fingerboard extension…
Regardless, it’s remarkable what a £120 guitar can be made to play and sound like these days, still with room for improvement! For some extra parts and inspiration, check out StewMac’s offerings here.
The post Here’s how to mod an affordable T-type into the Tele of your dreams appeared first on Guitar.com | All Things Guitar.
Source: www.guitar-bass.net