DIY Workshop: Martin Guitar Kit Build Part Two
Our Martin acoustic kit build continues, as we level the kerfing, join the back plates and pop a little something in the oven. Huw Price shapes up…
For the first part of our Martin kit build last month, I created a body former for the sides of my 000 and started gluing the heel and tail blocks in place, and now it’s time to get things looking a bit more guitar-like.
Now, one thing I’ve learned the hard way in my time building and repairing instruments is the absolute necessity of keeping things square and centred. This is especially true of the heel block, and if you allow it to become tilted or twisted, setting the neck angle and even ending up with a playable guitar will be that much harder.
Even when the rims are lined up nicely in the mould I created, there’s nothing to prevent them from getting out of shape from pressure when gluing the top and the back. Most professional acoustic builders use two spreaders to hold everything in position while the body assembly takes place. One is used lengthways between the heel and tail blocks, and the second goes side to side between the innermost curves of the waist.
This easy to make spreader set will hold the sides and blocks square in the mould throughout the body building process
Although you can buy spreaders from luthier suppliers, you can also make your own. I saw off some more blocks from the length of timber I used to create the mould blocks last time out and buy a length of threaded metal rod with some nuts and washers. You can find these items in most DIY outlets.
Holes marginally greater in diameter than the threaded rod – but narrower than the washers – are then drilled into the spreader blocks, and the rod is then cut into suitable lengths. With the nuts and washers in position, the blocks are then slipped over the ends of the rods and the nuts adjusted to press the spreader blocks against the sides.
The idea is that the spreaders will only be removed once the top and back have been glued on. So, I double up the blocks at each end between the heel and tail blocks in order to keep the longitudinal rod’s length to a minimum. This is important because if it’s too long, you might be unable to remove the rod through the soundhole.
Nothing fancy is needed for gluing the kerfing and a set of clothes pegs works just fine
Kerf-fuffle
As the sides are barely 2mm thick, there’s insufficient width to achieve a satisfactory glue joint for the top and back plates. To increase the gluing surface area, strips of kerfing are fixed around the edges of the rims. Various timbers are used, but Martin’s appear to be mahogany. The strips are tapered and sawed halfway through at 7.5mm intervals, which allows them to bend easily and conform to the guitar’s curves.
Gluing kerfing is quick and easy, but I find it best to divide each quarter into three sections. The one tricky area is the waist because, with OM and 000 shaped guitars, the curve is too pronounced for the kerfing and it tends to snap. Try heating the kerfing before bending it around the waist – a paint stripper gun or hairdryer should work fine. This softens and loosens the fibres, which makes the kerfing more pliable and less likely to snap.
220 grit sandpaper fixed to a flat plank with double-sided tape is used to level the kerfing with the rims
Apply glue to the flat side of the kerfing and position it against the side, leaving it slightly above the rims all the way around. Believe it or not, clothes pegs are ideal for clamping the kerfing in position while the glue dries. You can also use bulldog clips as an alternative if you wish.
Having applied kerfing around the rear edges of the body, I use a file to remove some of the kerfing’s excess height. Then I take a dead flat length of timber with 220 grit paper attached using double sided tape. This soon brings the kerfing dead level with the rims while keeping everything flat and square.
Many modern builders prefer angling the edge gluing surfaces to conform to the curvature of the front and back plates, but Martin’s traditional method is to level the kerfing at a right angle to the sides. Huss & Dalton offer both styles, with the Martin method deemed to generate more bass, power and projection, but less midrange. In contrast, angled kerfing is said to produce a more even frequency balance.
The glue squeeze out is cleaned, the inside edges are sanded and the levelled kerfing is flat against the backing board
I decide on flat kerfing, because this is a Martin kit and I do appreciate traditional Martin tone. The first strips of kerfing are glued with clamps holding the rims square, but I install the spreaders when I flip the rims over to do the front side. With the body in the mould I carefully remove any glue squeeze out from the kerfing and sand the inner surfaces of the sides. Mahogany is a lovely wood to work with, and before long the sides look clean and tidy.
Truing the edges
Jointing the back plates demands some precision woodworking but specialist tools are not required. In a process known as candling the plates are brought together on a large window. When you look carefully at the join, you will see light shining through gaps at various places along the length. You often need to adjust your viewing angle to see them, but gaps are always there. Back in the day this was done by candlelight – hence the term – however daylight works, too. This is done because all gaps must be eliminated to ensure a strong and long-lasting glue joint.
With the back plates brought together against a flat piece of glass, daylight can be seen through the gap
To eliminate the gaps you’ll need to make a shooting board. Two flat pieces of 18mm MDF or plywood will do fine. Ensure the lengths are equal and longer than the body length of the guitar. The width of one can be less than the other, or you can offset them when you glue one on top of the other. The idea is to create two levels, so the offset pieces of equal size will yield two shooting boards.
Take the back plates and place one on top of the other so that both inner surfaces are facing outwards. Place the back plates on the higher tier of your shooting board with the joint edges overlapping the lower tier then line them up exactly before clamping the plates in position at each end. The traditional way of trueing the edges is to run a long jointer plane along the length. The plane is positioned with its side surface flat on the shooting board’s lower tier and the blade should be set for the finest possible cut. Block and jack planes are really too short for this job.
This shooting board has seen a lot of use, but it’s still going strong and it only takes minutes to make one yourself
If the shavings are so thin that they turn to powder when you rub them between your fingers, the blade depth is about right. The blade must also be set dead square so an even amount of wood is removed across both joint surfaces. My advice would be to practise on scraps of timber to set the plane correctly before moving onto the back plates. Make two or three passes then unclamp the plates to check your process using the candling method. It’s vital to have perfectly flat glass and I can report from experience that Edwardian and Victorian glass is not flat!
If you’re inexperienced with planes, or you don’t own one, you can use sandpaper instead, but you’ll still need that shooting board. The abrasive must be attached to a dead flat surface – like a carpenter’s level or even a jointing plane with its blade fully retracted – with double sided tape. Since we’re dealing with small fractions of a millimetre here, I’d suggest 320 grit.
The jointing process reaches its final stages as we move from using the plane to sandpaper
I’ve never gotten this quite perfect by using a plane alone. This occasion is no exception, and it’s only when I swap to sandpaper that I finally manage to close the gaps. Once you’re in the ballpark, you’ll probably see gaps in certain areas along the joint. Try marking these areas with a pencil to use as a guide when you’re removing material from the adjacent high spots.
Towards the final stages you may only need one or two passes with the sandpaper. Taking the plates on and off the shooting board can get tedious, and if you’re doing this for the first time, don’t be discouraged if it takes you a few hours to get it right. This bit can be tough no doubt, but do persevere, because you’ll get there eventually.
One plate is propped up and strips of binding tape are stretched across the join line leaving small gaps at the centre
Gluing the plates
There are various ways to glue the back plates together, but this particular procedure is slightly complicated because the plates have already been shaped. After researching online, I discover Chris Paulick’s tape method and I decide to give it a try. For this you’ll need a backing board with a plastic surface or a plastic tape covering to prevent the plates sticking to it. Carefully align the plates and prop one of them up by about 5cm with the other lying flat. You may need to tape the flat piece to the backing board to prevent it sliding.
Take some tape that has some degree of stretchiness – Rothko & Frost’s binding tape works just fine. Pre-cut about 20 or so 5cm strips then place them at 2cm intervals all along the join line. The crucial bit is that you must stretch them across leaving a slight gap above the join line.
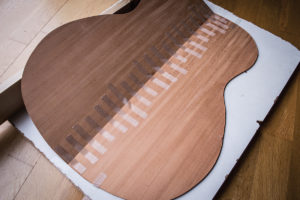
Carefully bring the plates back together with the tape strips on the inside and lightly clamp them with the joint side up in a vice or workbench. Run a line of glue evenly all along one edge, then remove the plates from the clamp. Place the plates on the backing board tape side down. If the tape has been applied correctly, the plates will be raised up in the centre like a tent.
The plates are pressed flat with the tape strips on the underside then weighed down and clamped overnight as the glue dries
Now press the centre line flat against the board and the stretchiness of the tape should pull the plates together. Ensure the plates are flat and properly aligned all along the glue line then wipe off the glue squeeze out with a damp rag. Place a flat plank of wood over the join line and place a heavy weight on top. I use a concrete block and protect the plank with a layer of plastic packing tape. Since the block is shorter than the body, I also clamp the ends.
For this job I decide on Titebond original glue. It’s an aliphatic resin that is very popular with guitar builders and it has a much longer open time than hide glue. The plates are left for 24 hours before I remove the clamps and the block and I’m pleased with the way it turned out.
The tape method works, it costs next to nothing and it’s an ideal solution for DIY guitar building. I would suggest one or two practice runs before gluing up – but bear in mind that the tape strips will lose some of their stretchiness, so they’ll need to be renewed each time. Good preparation is also key, so make sure your wet cloth, plank, claps and weight are all close at hand before you start.
The kit included a black centre strip but we prefer the no-line look and the plates matched up pretty well without it
Oven ready
No doubt this next part will have some experienced guitar builders rolling their eyes but, having been greatly impressed by the tonal properties torrefied timbers on guitars I’ve played of late, I decide to attempt it myself. Much as I would have liked to torrefy the top plates, I worry that the heat is going to compromise the glue joint. However, the braces seem like fair game and, after talking it over with Alister Atkin, I decide I’ll follow his procedure by baking them at 100 degrees centigrade.
My main concern is that the wood might twist a bit when they go into the oven, so I wire up the two back braces tightly against a perforated metal plate – in this case baguette moulds fit the bill nicely. After 90 minutes in the oven the cooled braces look very slightly darker than the non-baked braces.
Two of the back braces are wired tightly before sitting in a 100-degree oven for 90 minutes
To my relief they hold their shape, have a noticeable ping when tapped and rustle loudly when being handled. Suitably encouraged, I go ahead and bake the remaining braces. Of course this isn’t proper torrefaction as such, but it is good fun!
When we check back with the Martin in a couple of months time, we’ll move on to bracing. It will also be the time when I’ll have to decide whether to brace the top in the modern or pre-war style. A genuine 1930s Martin would certainly help with the measurements – so watch this space because you never know what might turn up…The post DIY Workshop: Martin Guitar Kit Build Part Two appeared first on The Guitar Magazine.
Source: www.guitar-bass.net


