The magic of partscasters – build your perfect guitar yourself
Ad feature with StewMac
We all know the myth of the ‘endgame guitar’ – it’s rare that one single instrument is the final piece of the puzzle for your rig. But there’s a good chance you’ve got some idea of what your perfect guitar might be, and there’s an equally good chance this perfect guitar isn’t just hanging on the wall of a guitar shop. Maybe it has some wild arrangement of specs and features that you’ve been hunting down for years – maybe it’s a more standard guitar with your own stamp on it. In any case, let’s explore how you can follow in the footsteps of Eddie Van Halen and Tom Morello and assemble that perfect guitar from parts.
Parts unknown
The two most important parts of a part guitar are, of course, the body and the neck. Making sure you’ve got a good match between the two, and the right sort of body for the kind of instrument you want to make, is crucial. There are a lot of options out there, either via the custom body route or official Fender parts – you could even salvage a body or neck from an existing instrument.
The most important thing a body defines is what kind of bridge you work with in the end. Broadly speaking each kind of bridge commonly found on Fender-style instruments presents a different level of challenge when it comes to getting assembly right. The least confounding is the straightforward hardtail setup – this includes Telecaster-style bodies with a full bridge plate, and bodies designed for shorter hardtail bridges, like the Telecaster Deluxe or Hardtail Stratocaster bodies. You can also find custom bodies in all sorts of shapes that accommodate various styles of hardtail bridges.
You then have the Stratocaster-style block vibrato – this requires a bit of finesse, but as long as the body you find has high-quality mounting holes already drilled (or you have a steady drilling hand), it’s not that bad. After this is the offset-style vibrato found on Jazzmasters and Jaguars, which requires a good deal of accuracy to get a well-performing string path, and of course is infamously fiddly even once it is assembled.
The blank neck for the project.
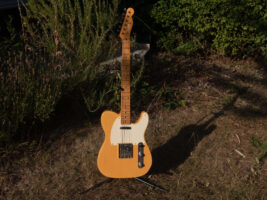
Today I’m working with a Telecaster-style body and a Fender neck, both relic’d. The Tele platform is, as I mentioned, relatively straightforward, but it’s not without its own challenges – regardless, it’s a good place for a beginner to start thanks to the lack of a vibrato with moving parts and extra things to align.
Start with the Finish
The body in question – without any shielding, electronics or hardware.
If it’s your first time assembling a parts guitar, then it’s probably a good idea to get a body and a neck that are already finished. The art of finishing is by no means inaccessible, but it can be a big hurdle for first-timers – there’s a lot that can go wrong, and depending on what kind of finish you opt for, the process itself can require a lot of practice and patience.
Getting pre-finished parts takes that worry out of the equation, but if you are keen to give it a go, StewMac has some excellent in-depth guides and info on the various finishing processes you can apply to get the right look for your guitar – just remember, don’t ever rush it!
Pickup some ideas
What kind of body you choose will define what kind of pickups you can go for – some bodies are more flexible than others, with swimming-pool routes that allow for any and all pickups, while some – like the more traditional Tele-style body we have today – won’t take non-standard pickups without serious modifications.
To help make the decision, it’s good to work backwards from the kinds of sounds that you want your perfect guitar to be capable of – do you want vintage PAFs? Full-throated Wide Range humbucker tones? Spanky single-coils? Thanks to the very wide world of aftermarket pickups, there are options that incorporate a wide range of sounds into all sorts and sizes of pickups. Getting a Tele doesn’t chain you to single-coils, for instance, as there are single-coil-sized humbuckers designed specifically for them.
If you need some inspiration, StewMac has a huge stock of various pickups, ranging from lovingly recreated PAF-style humbuckers to active EMGs, from vintage Tele single-coils to powerful blade pickups. For our purposes today we’re sticking with StewMac’s own vintage-style Tele single-coils.
Shields up
The same body, shielded with copper tape. All of the separate cavities shielding parts have been joined with a wire or a strip of shielding tape.
If you’re keen to cut down on hum, you’ll want to shield the body cavities with conductive tape or paint. When the shielding is connected to ground, it works as a faraday cage, protecting the signal-generating parts of the guitar from external noise.
I opt for conductive tape. The Tele body in particular presents the fun challenge of getting all of the different cavities connected, and for that I use either a strip of tape between the two cavities that are hidden by the pickguard, and a jumper wire to connect these to the control cavity. Similarly the bridge plate is connected to the electronics’ ground via a stripped wire, sandwiched between it and the body.
Check the fit
Of course pickups are often fitted into pickguards, and one thing you quickly learn when assembling a parts guitar is that eventually, something just won’t fit, especially if you’re using a smorgasbord of parts from different brands.
Doing a dry fit is always a good idea, even if your body already has pickguard screw holes. If it doesn’t, it’s good to position the guard with everything installed before marking and drilling, just so you know that it’ll be properly aligned without any components crashing into cavity walls and so on. You may find you need to plug existing pickguard screw holes and re-drill them, or shave off a millimetre of pickguard to let a pickup through – just be careful, go slowly, and remember the age-old adage: measure twice, cut once.
And talking of things fitting – you’ll want to check that your neck is the right kind. If you’re building a Telecaster-style guitar, a traditional Tele pocket is designed for a square heel. Hence a Telecaster-style neck will fit in a Strat-style pocket (with a little gap), whereas a Strat-style neck’s rounded heel means it won’t fit in a Tele-style pocket!
The neck, ready for mounting holes to be drilled. I’m using a cardboard caul to ensure the frets aren’t damaged by the pressing motion, and a concave curved piece of wood to keep the neck itself as vertical as possible.
The neck I’m using today also doesn’t have any mounting holes. And so I get the bridge installed, loosely string up an outer E to ensure alignment, and then clamp it in place, using a cardboard caul. Once I know the neck is aligned properly I mark the positions for the screw holes with the sharp end of a brad-point bit, and unclamp it all so I can drill them straight and true with a press – you’ll want to use a bit that’s the same diameter or very slightly larger than the shank of the neck pocket screw you’re using.
For more on what fit and alignment issues you might run into, check out StewMac’s full guide to assembling a parts guitar here. In fact, little like the measure twice, cut once adage, there’s not really too much reading you can do before embarking on a project like this!
Hardware and electronics
The body and neck we’re using today are relic’d, and so to complete the look of an aged guitar we can grab some aged hardware to match. StewMac has a veritable treasure-trove of ready-aged hardware, including a lovely Gotoh bridge that has a super vibey vintage aesthetic but also compensated saddles to keep things in tune. The Kluson tuners are an easy fit and also come pre-aged, so they don’t stick out like a sore thumb next to the aged Fender logo!
Of course, you may not like the relic vibe, or want to add a bit of modern panache to proceedings – that’s fine too, as of course this is your guitar that you’re making! There are lots of different modern options, each of which is suited for different aesthetic tastes and playstyles.
The guitar’s control plate, all wired up. Here the pickguard screws are yet to be drilled, as I want to ensure the pickguard will key against the completed control plate before I commit to a location for it.
Once everything else is ready, I assemble the guitar’s electronics on the control plate – once it’s all wired up I give it the old screwdriver tap test to check that the switch and controls work. All this involves is plugging in and tapping the pickups with something metal, just to establish that the guitar makes the right signals in different switch positions, and the controls actually function – it’s good to check this before you get everything strung up and ready to go.
All together now
So that’s it all assembled – there are, as with all things guitar, a lot of improvements you can make to a simple parts instrument – once it’s working and making sound, there’ll be a long process of dialling in the action, neck relief, pickup height and so on to get it playing its best. It’s rarely a case of just bolting a body onto a neck and calling it a day, but the process is absolutely not beyond the average enthusiastic guitar-modder! Building a parts guitar is a great way of getting an instrument with your stamp on it, and when playing it you’ll feel even more connected to it knowing it was your handiwork that brought it into being.
For more on assembling parts guitars, check out StewMac’s full guide here.
The post The magic of partscasters – build your perfect guitar yourself appeared first on Guitar.com | All Things Guitar.
Source: www.guitar-bass.net